Cuando hablamos de posicionamiento en buscadores rara vez hablamos de la velocidad del blog como parte fundamental del SEO.
Sabemos de la importancia de la velocidad de carga pero normalmente la vemos como parte de la mejora de la experiencia del usuario sin darnos cuenta que es uno de los puntos en los que se fija nuestro amigo google para posicionar nuestra web.
Si tenemos nuestra web hecha con WordPress podemos acelerar su carga considerablemente activando un plugin para cachear nuestra web. ¿einnn? ¿que significa eso?
Cuando un visitante entra en nuestrá página lo que el usuario ve en pantalla se construye de forma dinámica, es decir, WordPress procesa la petición a PHP, este realiza una llamada a nuestra base de datos Mysql y se genera lo que vemos en pantalla. Cuando cacheamos nuestra web lo que hacemos es tener preparada la pantalla que vamos a mostrar al usuario reduciendo de forma considerable las llamadas a la base de datos y aumentar la velocidad de nuestra web.
Hay dos plugins muy famososos para activar el caché en nuestra blog en wordpress:
WP Super Cache –> Descargar
W3 Total Cache –> Descargar
¡Atención!Mucho cuidado
Antes de hablar de como configurar el cache, una advertencia muy importante, hacer copia de seguridad antes de probarlos. Siempre que hagamos algo «agresivo» es importante hacer copia de seguridad pero en este caso es si cabe más importante.
Son plugins muy potentes que nos pueden dar algún dolor de cabeza si jugamos con ellos sin tener precauciones.
Los dos plugins mencionados son muy buenos pero W3 Total Cache es mi preferido y vamos a configurarlo correctamente:
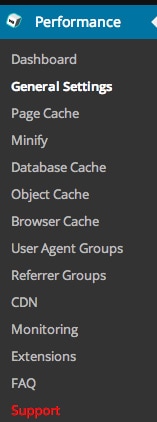
Instalamos y activamos el plugin como cualquier otro plugin. Si todo ha ido bien tendremos en el lateral de nuestro escritorio el apartado «Performance» como vemos en la pantalla siguiente:
Hacemos click en General Settings y configuramos las siguientes opciones:
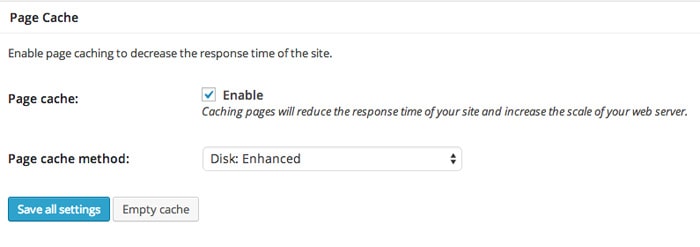
Page Cache: Activamos Enable y en la opción «Page cache method» seleccionamos la opción «Disk: Enhanced» como vemos en la siguiente pantalla:
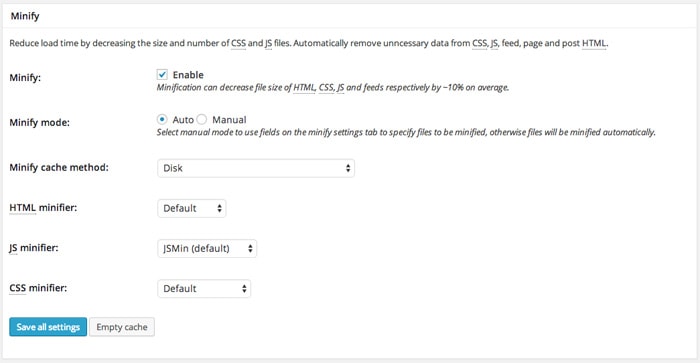
Minify:
Activamos Enable
En Minify Mode marcamos auto
Minify cache method: Disk
El resto de opciones por defecto
En esta pantalla podéis ver como queda:
Database Cache: Marcamos Enable y como método Disk
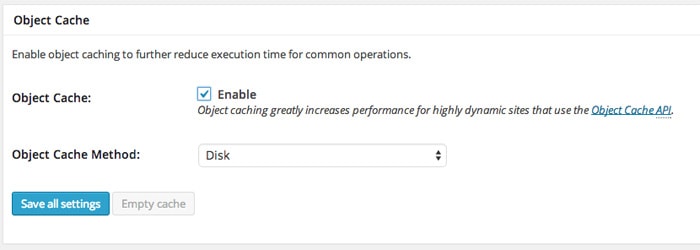
En Object Cache: Activamos Enable y como método Disk
En Browser Cache simplemente marcamos Enable:
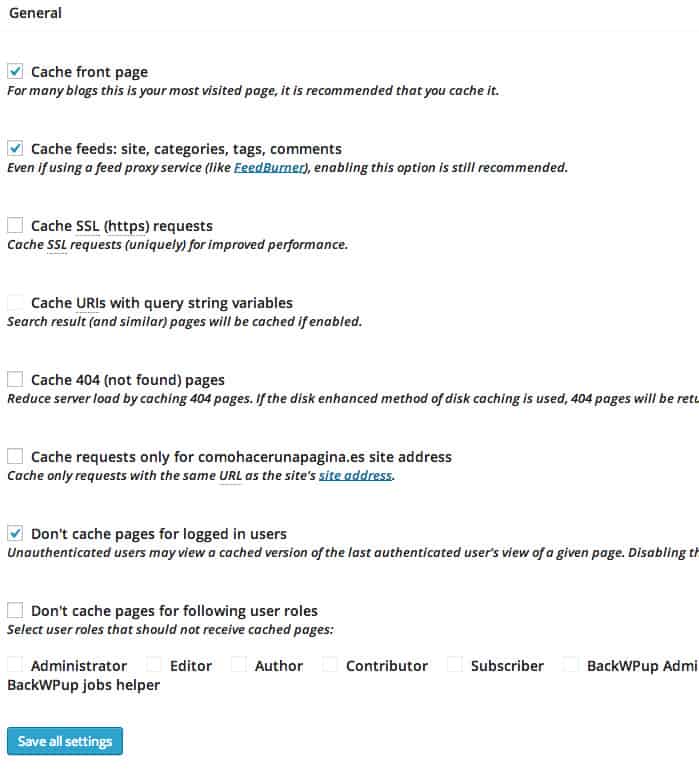
Ahora hacemos click en la opción del lateral «Page Cache»
En esta opción marcamos:
Cache front page
Cache feeds
Don’t cache pages for logged in users
Aquí la imagen de como quedaría:
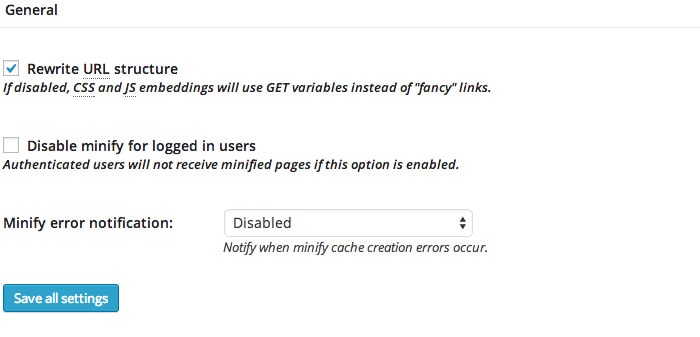
Pasamos a la opción Minify:
Esta opción quedaría de la siguiente forma:
General: Marcamos Rewrite URL Structure
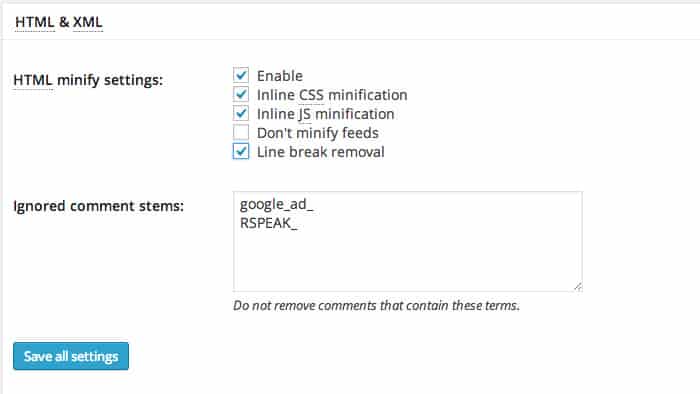
En HTML minify settings marcamos:
Enable
Inline CSS minification
Inline JS minification
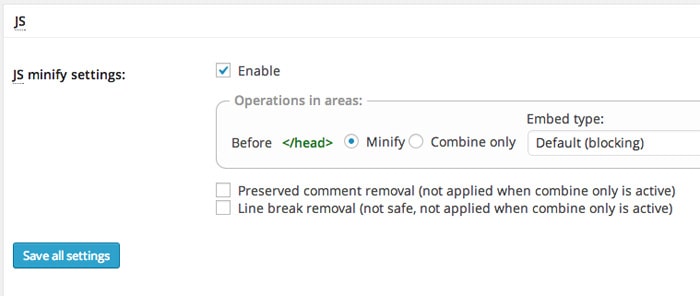
En JS lo dejamos por activado por defecto
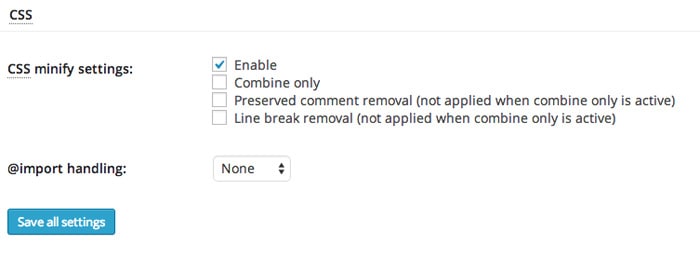
En CSS simplemente lo activamos:
Y en la sección Minify no tocamos nada mas. Nos vamos a la siguiente opción, Database Cache y tocaremos sólo la primera opción «Don’t cache queries for logged in users»
La siguiente opción «Object Cache» y la opción Browser Cache lo dejaremos por defecto.
Bueno, ahora que tenemos nuestro blog volando gracias a W3 total Cache vamos a darle una vuelta de tuerca gracias a la versión gratuita de Cloudflare.
Cloudflare nos va a acelerar el blog pero además nos va a añadir una capa de seguridad que nos va a proteger de ataques.
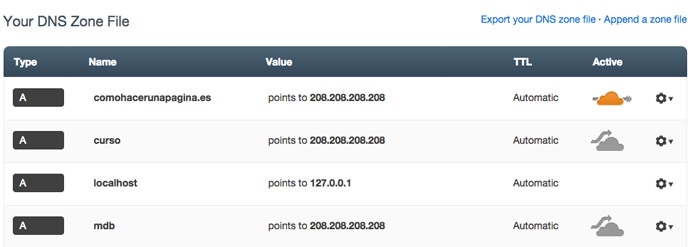
Lo primero que tenemos que hacer al darnos de alta es añadir nuestro dominio, una vez hecho cloudflare rastreará nuestros DNS y una vez acabado nos da unos DNS que tenemos que poner en el lugar de los existentes.
Tendremos una pantalla como la siguiente:
Al hacer click en siguiente llegamos a una pantalla que nos da a elegir entre una versión gratuita o una versión de pago, elegimos la gratuita ya que es muy completa.
Una vez acabado nos da unos dns que tenemos que añadir en la configuración de nuestro dominio, cambiando lo actuales por los que nos da Cloudflare y sólo nos queda esperar que el registrador del dominio lo cambie.
Cuando Cloudflare detecte que los dns están bien te enviará un email avisando que ya está funcionando.
En este punto ya nos estamos beneficiando de la seguridad y el aumento de velocidad que nos proporcina Cloudflare pero lo podemos integrar con nuestro «amigo» W3 total cache.
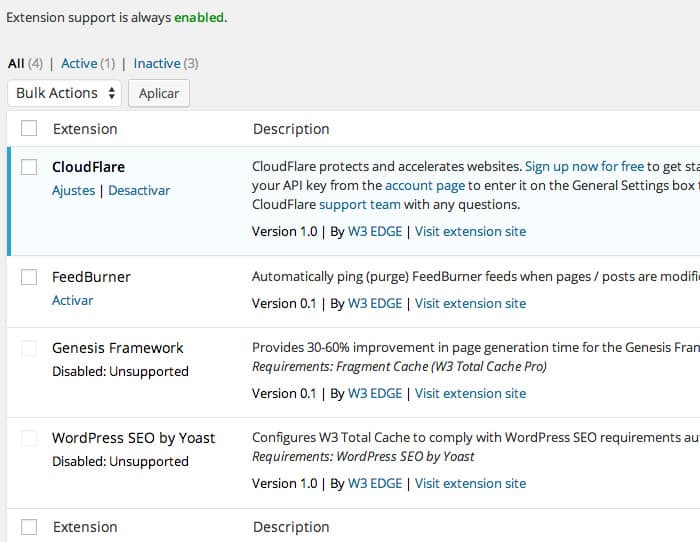
Para ello volvemos a la configuración del plugin W3 Total Cache y hacemos click en la opción Extensions y activamos la primera extensión que aparece que es la de Cloudflare:
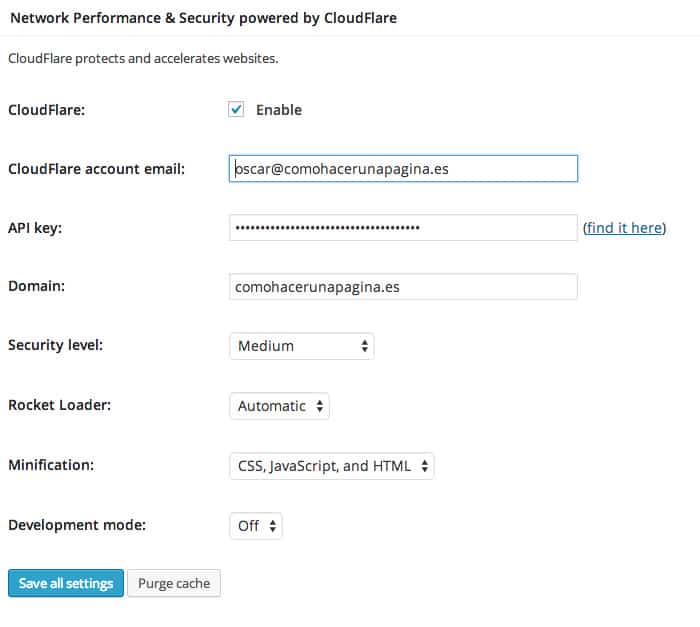
Una vez activado, hacemos click en Ajustes, hacemos click en enable y rellenamos los campos como puedes ver en la siguiente pantalla:
El Api Key lo puedes encontrar en tu cuenta de Cloudflare en Account.
Hasta aquí la configuración de W3 total cache junto con Cloudflare. Notaréis la diferencia 😉
