Hola chicos,
¿Qué tal?
Hoy os traigo un pequeño tutorial pero creo que muy útil si estás trabajando con Gutenberg y especialmente con los Bloques Reutilizables.
Algo maravilloso que tiene Gutenberg es la posibilidad de crear tus propios bloques, guardarlos y usarlos tantas veces como quieras.
Para el que no lo sepa, crear un bloque reutilizable es muy sencillo.
Crear Bloques Reutilizables
Un bloque reutilizable puede estar compuesto por uno o más bloques por lo que es ideal para crear elementos personalizados y luego poderlos usar en cualquier página o entrada.
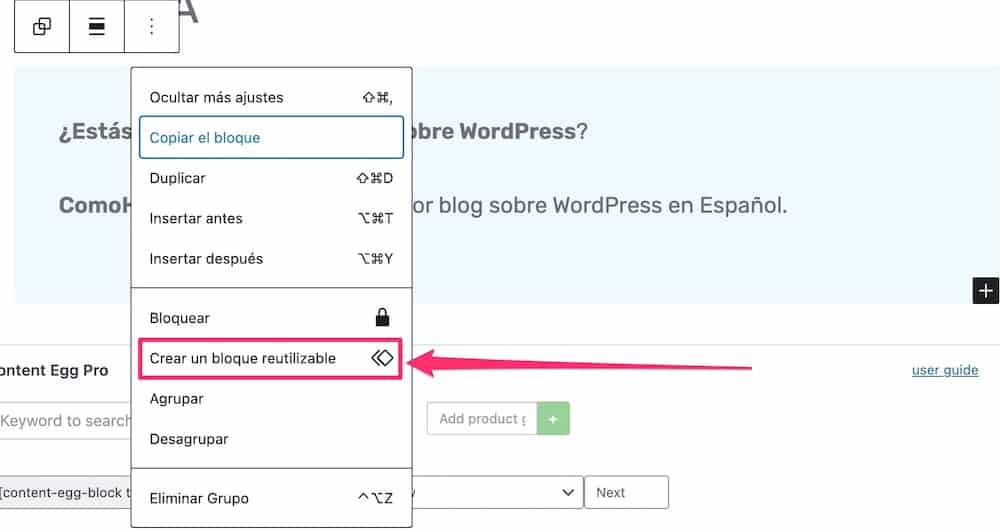
Para crear un bloque reutilizable es tan fácil como ponerte encima del bloque, hacer click en los 3 puntitos y seleccionar la opción Crear un bloque reutilizable tal como puedes ver en la siguiente captura
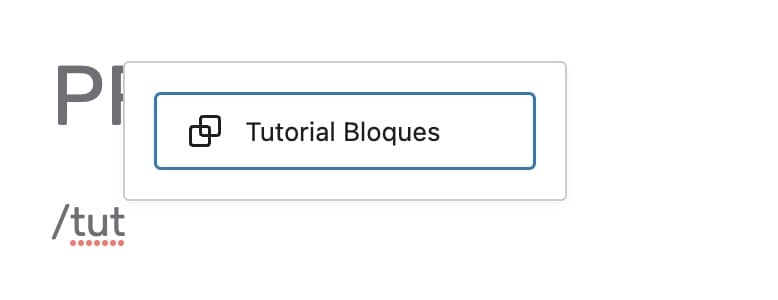
Una vez creado el bloque reutilizable si lo quieres usar tan solo añades un nuevo bloque y buscas el nombre que le hayas dado:
Gestionar Bloques Reutilizables
Como hemos visto, añadir un bloque reutilizable es muy sencillo. ¿Pero que tal será gestionarlos?
Verás que fácil pero nosotros lo vamos a hacer todavía más fácil 😉
Lo primero que tienes que saber es que si modificas el bloque reutilizable se modificará en todos aquellos lugares donde esté insertado. Algo realmente útil.
Si quieres que no sea así siempre puedes usar la opción Convertir a Bloques normales.
Cuando hagas eso, las modificaciones no serán globales, sino solo se modificará el bloque en el que estás.
Para modificar un bloque reutilizable tienes 3 opciones:
Modificar un Bloque Reutilizables desde un Bloque Insertado
La primera y más fácil opción para modificar un bloque es ir a una página o entrada donde tengas insertado el bloque, modificar lo que quieras y guardar. Una vez hecho se modificará en todos los lugares insertado.
Modificar un Bloque Reutilizable desde Gestionar Bloques reutilizables
No siempre vas a querer modificar un bloque desde una entrada o simplemente puede que quieras ver todos tus bloques reutilizables en un solo lugar.
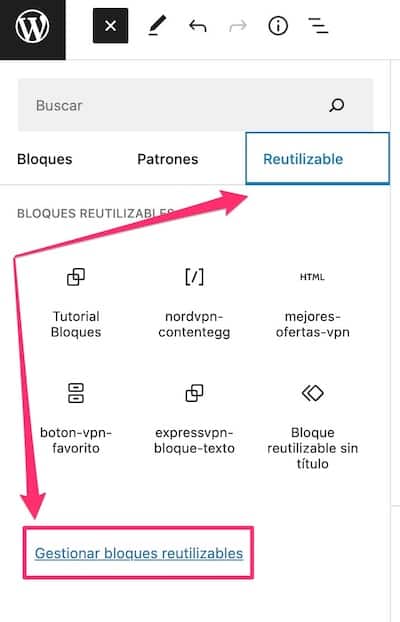
Para hacerlo tienes que ir al + para añadir un nuevo bloque, ir a la opción Reutilizable y hacer click en Gestionar bloques reutilizables:
Una vez que haces click llegas a una pantalla donde tienes todos los bloques reutilizables:
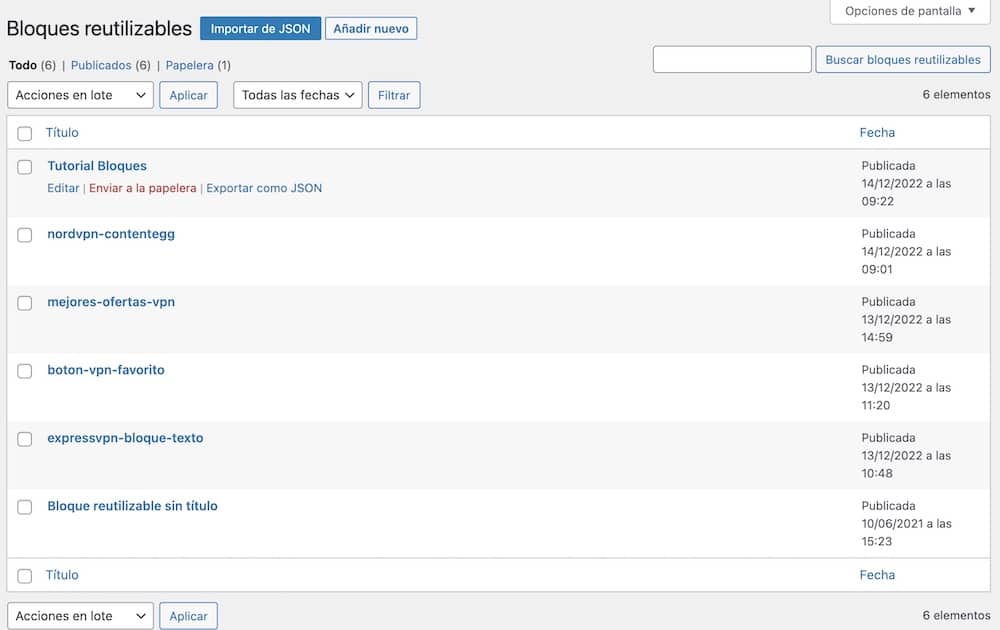
Y desde aquí puedes gestionar los bloques reutilizables como lo harías con las entradas, páginas o cualquier otro tipo de contenido.
¿Problema? Que de serie no se puede llegar a esta pantalla si no es tal como hemos hecho aquí pero a continuación os voy a decir como podemos convertir esta opción en un menú de administración de WordPress
Como hacer Visible en el Menú de WordPress los Bloques Reutilizables
Me parece muy raro que no esté de serie esta opción pero seguro que hay algún motivo para que no venga activado de serie.
Para poder añadir la opción del menú del acceso directo a la gestión de bloques reutilizables podemos añadir el siguiente código en el fichero Functions.php de nuestra plantilla.
Recuerda hacer backup antes de hacerlo y usar una plantilla hija
/**
 * Reusable Blocks accessible in backend
 * @link https://www.billerickson.net/reusable-blocks-accessible-in-wordpress-admin-area
 *
 */
function be_reusable_blocks_admin_menu() {
    add_menu_page( 'Reusable Blocks', 'Reusable Blocks', 'edit_posts', 'edit.php?post_type=wp_block', '', 'dashicons-editor-table', 22 );
}
add_action( 'admin_menu', 'be_reusable_blocks_admin_menu' );
El código lo he encontrado en este artículo
Una vez hecho veremos como nos aparece la opción Reusable Blocks en nuestro escritorio de WordPress:
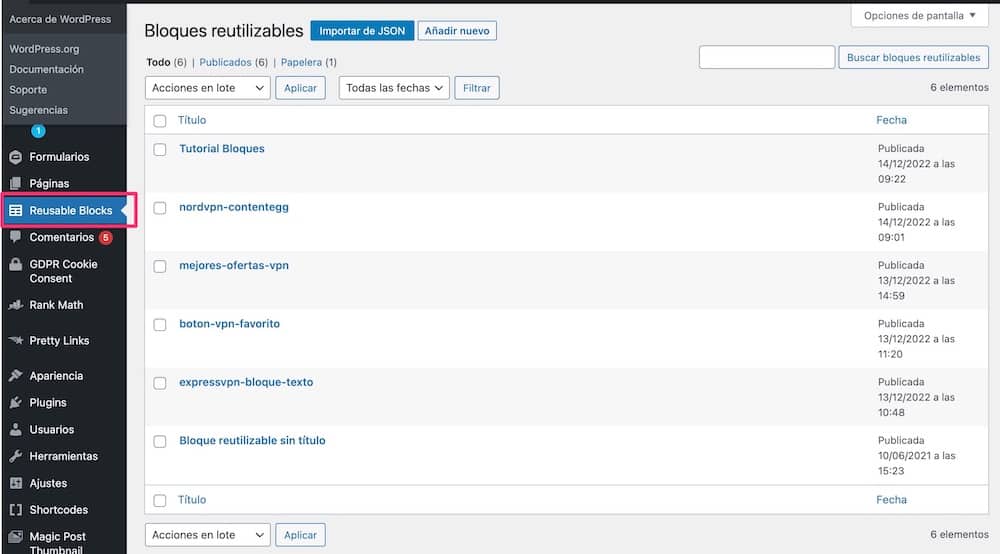
También he encontrado que se puede hacer con un plugin pero es tan fácil hacerlo con el código que prefiero no sobre cargar con más plugins, el plugin se llama Reusable Blocks Admin Menu Option
Espero que te haya sido útil 😉